Building a Self-Hosted CI/CD Stack Behind NAT: From EC2 to iximiuz Labs with Cloudflare Tunnel
This runbook documents the complete journey of building a production-grade self-hosted CI/CD stack on iximiuz Labs - from initial EC2 proof-of-concept, through NAT discovery, to the Cloudflare Tunnel solution, and finally to packaging everything as custom rootfs images.
Context and Motivation
The Original Goal
The goal was a self-hosted CI/CD stack consisting of Jenkins, SonarQube, and Nexus, each exposed on custom subdomains:
jenkins.ibtisam-iq.comsonar.ibtisam-iq.comnexus.ibtisam-iq.com
Complete infrastructure ownership - no managed CI/CD services.
Why iximiuz Labs
During CKA and CKAD certification preparation, iximiuz Labs appeared in the official Kubernetes documentation's "Before you begin" section. After passing both certifications, the goal shifted from exam scenarios to real infrastructure.
iximiuz Labs was chosen for:
- Custom rootfs support - define infrastructure as OCI images, version them in Git, provision them reproducibly.
- Persistent storage - 100 GB persistent volume survives session restarts; no rebuild from scratch each time.
- Flexbox playground model - up to 5 nodes per playground on a shared local network (
172.16.0.0/24), 24-hour runtime sessions, custom rootfs provisioning.
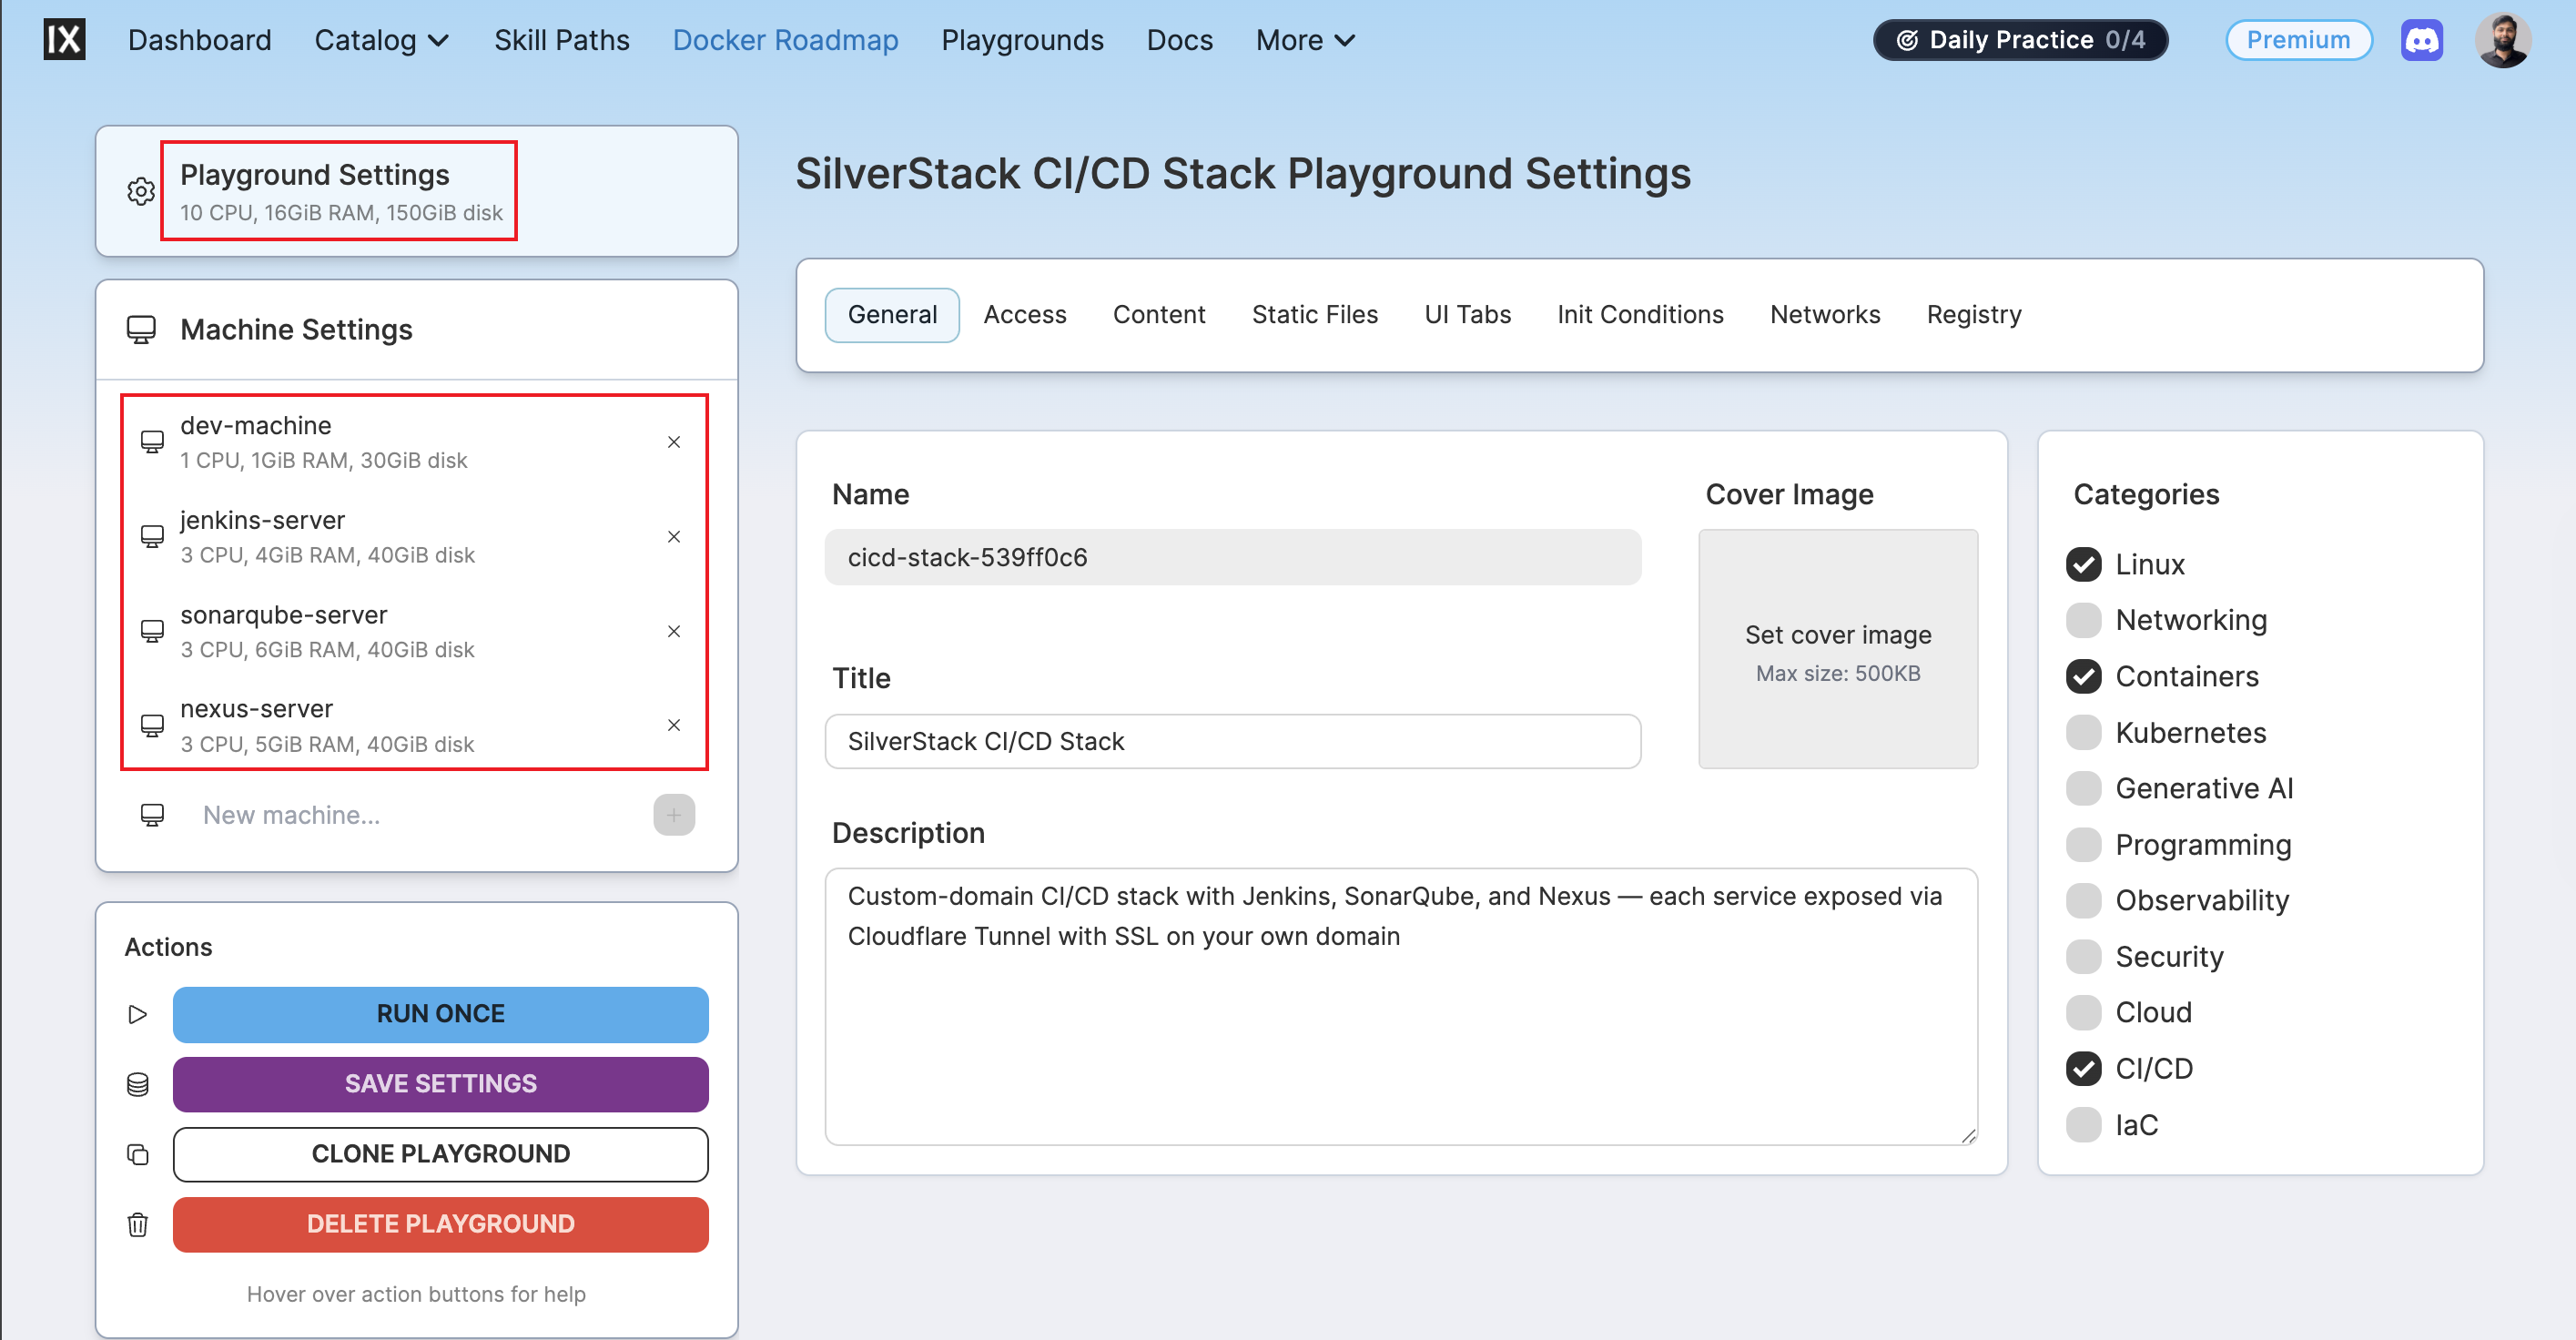
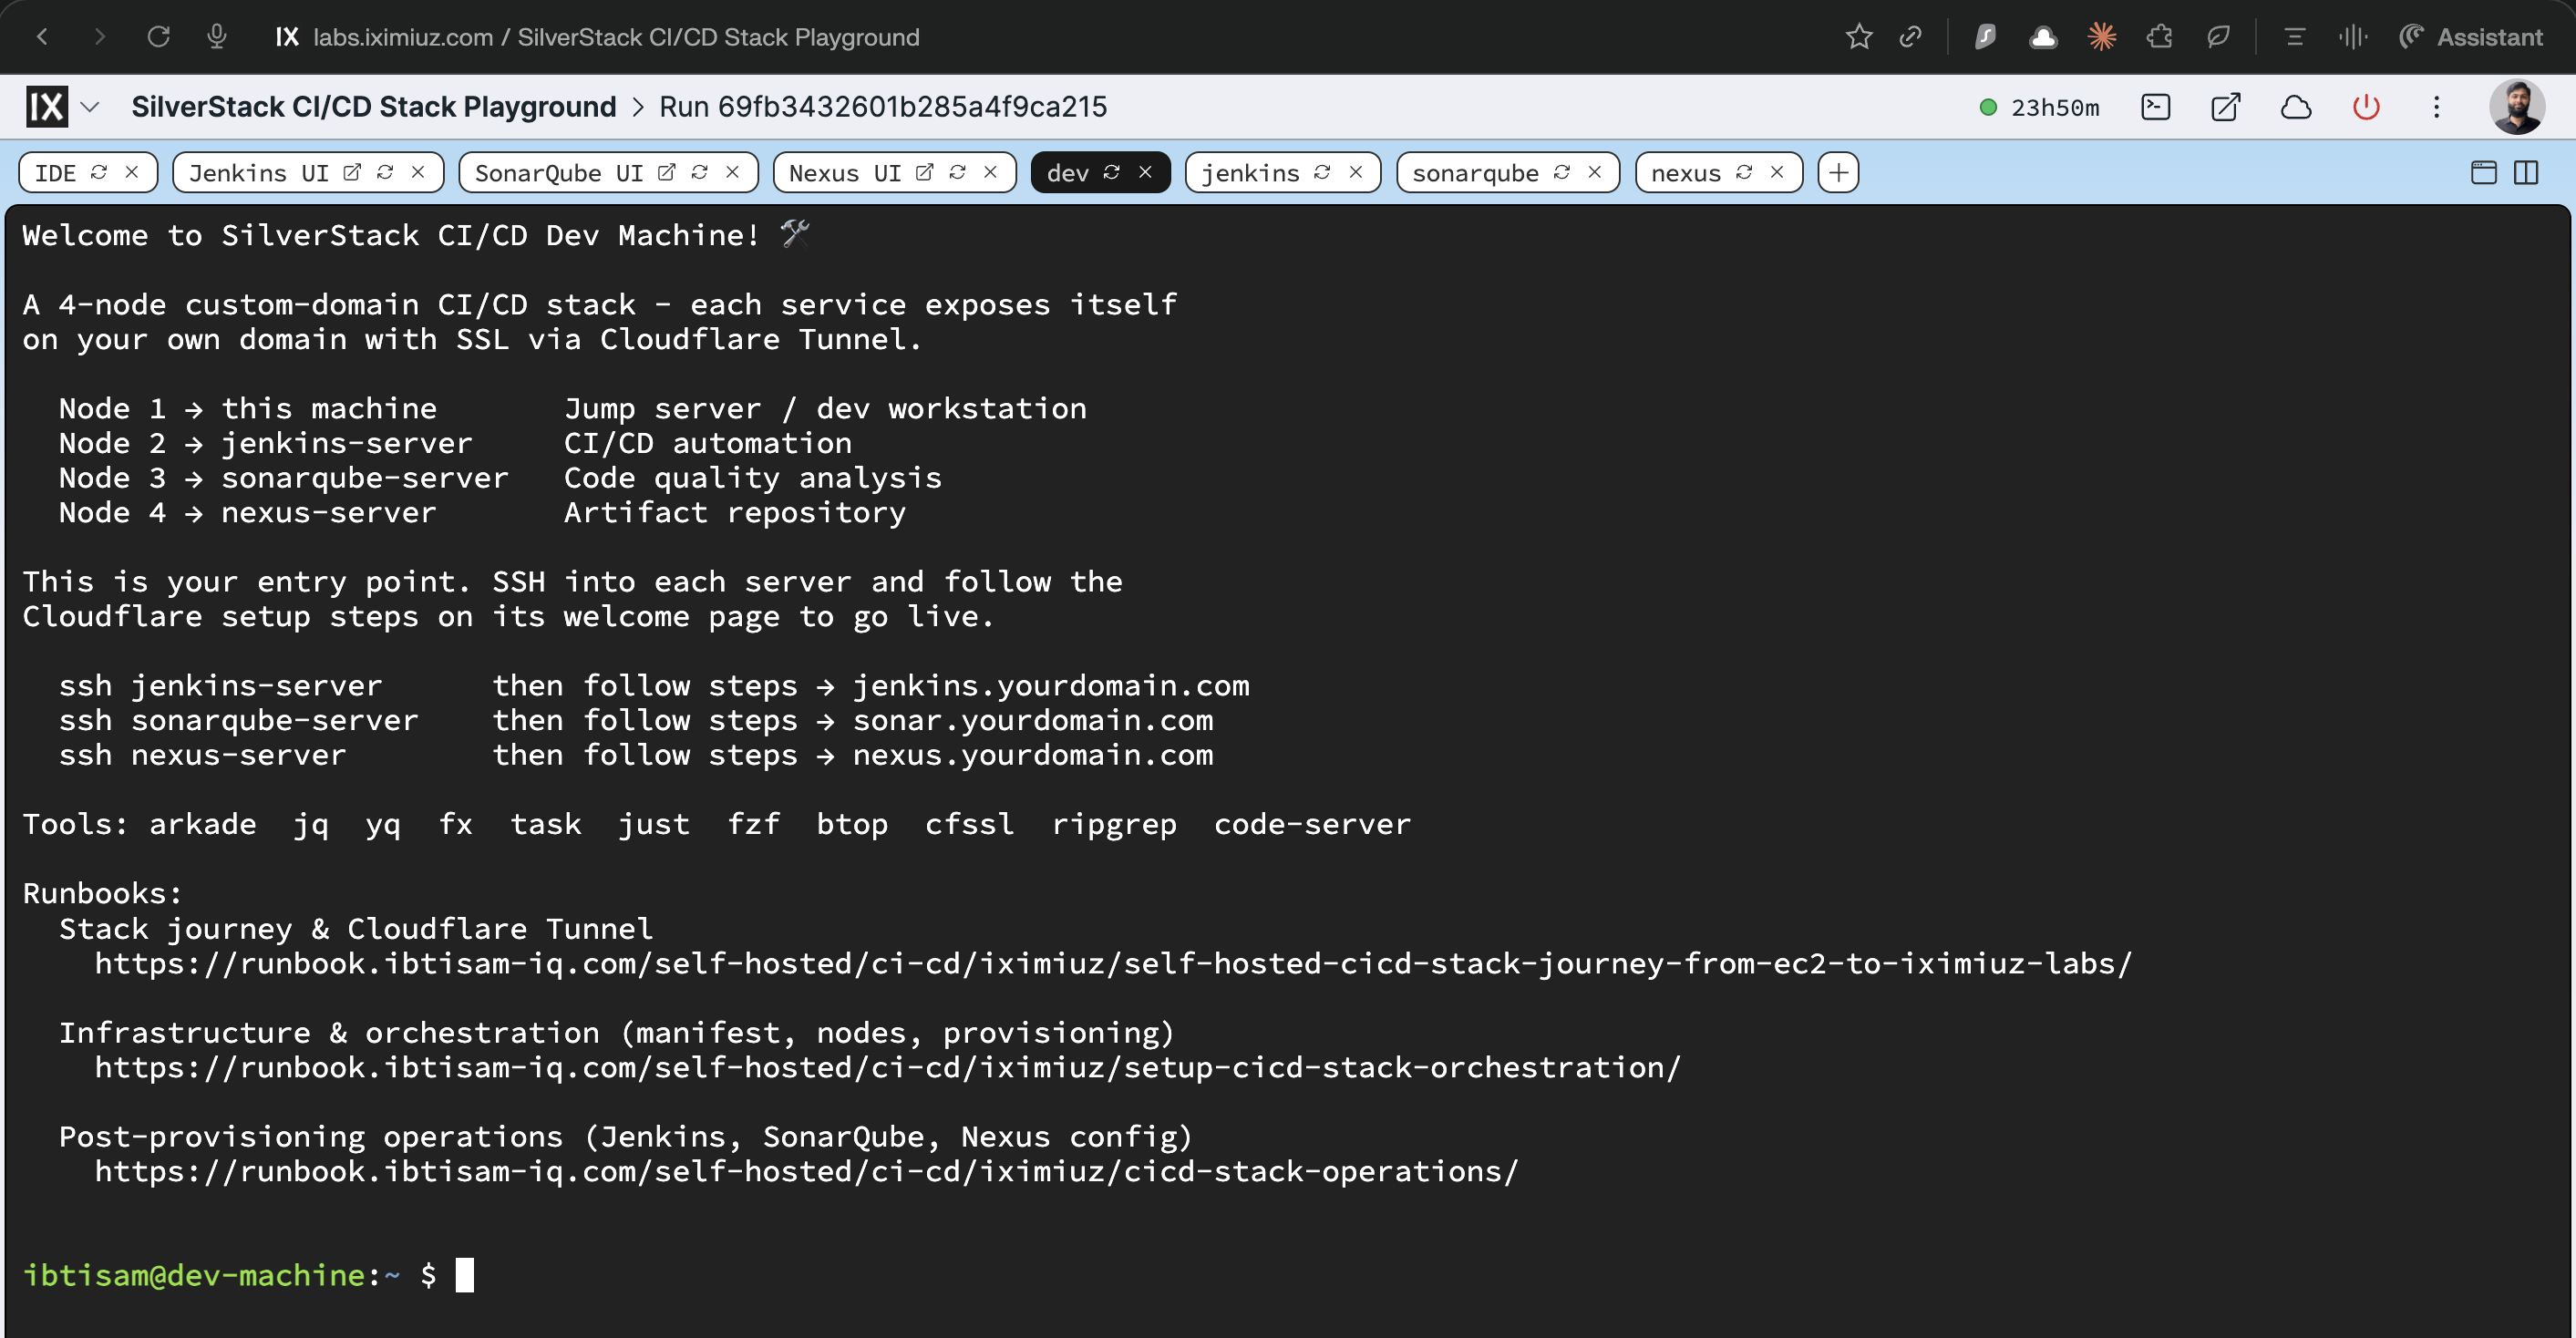
The Flexbox model is a natural fit for this stack: one node as a jump host, three for Jenkins, SonarQube, and Nexus.
Phase 1: Proof of Concept on AWS EC2
Initial Testing Approach
Before committing to iximiuz, 2–3 days were spent validating the full stack architecture on three separate EC2 instances - one per service:
| EC2 instance | Service installed |
|---|---|
| Instance 1 | Jenkins LTS |
| Instance 2 | SonarQube + PostgreSQL |
| Instance 3 | Nexus Repository Manager |
All three nodes received: Nginx reverse proxy (port 80 → service port), Let's Encrypt SSL via Certbot, and Cloudflare DNS management.
Why It Worked on EC2
EC2 instances have public IP addresses. This enabled:
- DNS A records pointing directly to each instance's public IP
- Certbot's HTTP-01 challenge reaching port 80 on each server to prove domain ownership
- Let's Encrypt issuing valid SSL certificates
- Clean routing:
Browser → Cloudflare → Public IP → Nginx :80 → Service port
The EC2 test proved the architecture was sound. The resulting Nginx configs, systemd service files, and startup scripts became the reference implementation to replicate on iximiuz Labs.
Phase 2: Moving to iximiuz Labs - The NAT Discovery
Attempting to Replicate the Setup
With the EC2 stack working, the same configuration was copied to an iximiuz Flexbox playground. Services started, Nginx responded on port 80, health checks passed - everything worked locally. But DNS and SSL setup hit an immediate wall.
The Discovery
Unlike EC2, iximiuz Labs does not display a public IP anywhere in the UI. Running curl ifconfig.me on all four nodes returned:
Every node returned the same IP. The nodes were behind Network Address Translation (NAT).
iximiuz Labs runs playgrounds as microVMs on bare-metal hosts using Firecracker. Each playground connects to a bridge network on the host; bridges of different playgrounds are isolated using network namespaces. All VMs within a playground share a single NAT gateway IP for outbound traffic - no inbound routing exists per VM.
Understanding Why Traditional SSL Setup Fails
NAT means:
VM 1 (172.16.0.2) ─┐
VM 2 (172.16.0.3) ─┤──► NAT Gateway ──► 148.113.47.48 ──► Internet
VM 3 (172.16.0.4) ─┘
Problem 1 - No unique public IP for DNS: DNS A records require one IP per domain. All nodes share the same NAT gateway IP, so it's impossible to create distinct A records for Jenkins, SonarQube, and Nexus. Even if all three subdomains pointed to 148.113.47.48, there's no port forwarding and no control over the NAT gateway to distinguish which VM should receive which traffic.
Problem 2 - Certbot HTTP-01 challenge requires inbound access: Certbot's HTTP-01 validation works by having Let's Encrypt make an HTTP request to port 80 of the domain's server. Behind NAT, the NAT gateway blocks all inbound traffic. Certbot fails with:
FAILED: Challenge did not complete successfully.
detail: DNS problem: SERVFAIL looking up A for your-domain.com
Problem 3 - Nginx is necessary but not sufficient: Nginx routes port 80 to backend services, but only after a request reaches the server. With no routable public IP, external traffic never arrives at Nginx.
| Approach | Why It Fails |
|---|---|
| DNS A record → shared NAT IP | All VMs share one IP; impossible to distinguish which VM receives traffic |
| Port forwarding | No control over the NAT gateway on a managed platform |
| Dynamic DNS (DDNS) | Still requires a routable IP per machine |
| Certbot HTTP-01 | Let's Encrypt servers cannot reach machines behind NAT |
| Self-signed certificates | Works for SSL but triggers browser warnings; not production-grade |
The Realization
The fundamental problem is inbound connectivity. Traditional server setups assume a request arrives at the server's IP. Behind NAT, that step is impossible. The solution is to reverse the direction entirely: instead of waiting for inbound traffic, the server initiates an outbound connection to an intermediary that already has a public IP and holds that connection open.
That intermediary is Cloudflare's edge network. The mechanism is Cloudflare Tunnel.
Phase 3: The Solution - Cloudflare Tunnel
The Core Concept
Cloudflare Tunnel (cloudflared) reverses the connectivity model. The server reaches out to Cloudflare and holds a persistent encrypted tunnel open:
Browser ──► Cloudflare Edge (jenkins.ibtisam-iq.com - SSL terminated)
                  │
                  │  persistent outbound tunnel (WebSocket/HTTP2)
                  │
            cloudflared daemon (on jenkins-server)
                  │
                  ▼
            Nginx :80 ──► Jenkins :8080
When a user requests jenkins.ibtisam-iq.com:
- Cloudflare's edge receives the HTTPS request
- Cloudflare finds the open tunnel from this server (identified by tunnel token)
- Cloudflare forwards the request down the tunnel
cloudflaredon the server proxies it tolocalhost:80- Nginx routes it to Jenkins on port 8080
No public IP required. No inbound firewall rules. No port exposure.
Why This Solves the NAT Problem
| Property | How It Works |
|---|---|
| NAT traversal | Outbound connections work through NAT by default; cloudflared initiates outbound |
| SSL management | Certificates issued and terminated at Cloudflare's edge - no Certbot required |
| No HTTP-01 challenge | Cloudflare provisions and renews SSL automatically for tunneled domains |
| Custom subdomains | Each tunnel maps to one subdomain; Cloudflare manages the CNAME record |
Phase 4: Implementation - Creating Cloudflare Tunnels
Step 1: Create the Tunnel in Cloudflare Dashboard
For each service (Jenkins, SonarQube, Nexus), create a separate tunnel:
- Navigate to
dash.cloudflare.com/one - Go to Networks → Connectors → Create a tunnel
- Choose Cloudflared as the connector type
- Name the tunnel (e.g.,
jenkins-lab,sonarqube-lab,nexus-lab) - Click Save tunnel
After saving, Cloudflare shows an installation page with the cloudflared service install command.
Step 2: Install and Run the Connector
cloudflared is pre-installed now in all three service rootfs images (jenkins-rootfs, sonarqube-rootfs, nexus-rootfs). Skip the apt installation step - it is already on PATH.
Run the install command shown by the Cloudflare dashboard on each respective server:
# On jenkins-server
sudo cloudflared service install eyJhIjoiZXlK...  ← token from Cloudflare dashboard

# On sonarqube-server
sudo cloudflared service install eyJhIjoiZXlK...  ← different token

# On nexus-server
sudo cloudflared service install eyJhIjoiZXlK...  ← different token
This installs cloudflared as a systemd service and starts it immediately. The tunnel token is stored in /etc/systemd/system/cloudflared.service. Verify:
Security note: The tunnel token is a sensitive credential - anyone with it can connect to Cloudflare's edge as this tunnel. Ensure
/etc/systemd/system/cloudflared.serviceis root-owned with mode0600.
Step 3: Configure Published Application Routes
Back in the Cloudflare dashboard for each tunnel, go to Published application routes → Add a published application route:
| Tunnel | Subdomain | Domain | Service | URL |
|---|---|---|---|---|
jenkins-lab | jenkins | ibtisam-iq.com | HTTP | localhost:80 |
sonarqube-lab | sonar | ibtisam-iq.com | HTTP | localhost:80 |
nexus-lab | nexus | ibtisam-iq.com | HTTP | localhost:80 |
Why localhost:80 and not the service port directly?
localhost:80 routes through Nginx. This keeps Nginx in the chain for:
- Request buffering, timeout management, and access logging
- A
/healthendpoint independent of the backend service - Flexibility: if a service port changes, only the Nginx upstream changes - the tunnel config stays the same
- Consistent entry point regardless of which service is behind
Cloudflare automatically creates a DNS CNAME record for each subdomain. No A record. No IP address.
Step 4: Verify Tunnel Connectivity
# Each domain should respond with valid SSL
curl -I https://jenkins.ibtisam-iq.com
curl -I https://sonar.ibtisam-iq.com
curl -I https://nexus.ibtisam-iq.com
# Expected: HTTP/2 200 with valid Cloudflare TLS cert
Why Separate Tunnels Per Service
| Tunnel | Server | Hostname |
|---|---|---|
jenkins-lab | jenkins-server | jenkins.ibtisam-iq.com |
sonarqube-lab | sonarqube-server | sonar.ibtisam-iq.com |
nexus-lab | nexus-server | nexus.ibtisam-iq.com |
Benefits of one tunnel per service:
- Isolation - taking down one tunnel does not affect others
- Independent lifecycle - each service can be restarted without impacting others
- Security - each tunnel has its own token; compromising one doesn't expose the other services
- Free tier - Cloudflare supports unlimited tunnels on free accounts

Phase 5: Complete Traffic Flow
https://jenkins.ibtisam-iq.com
    │
    ▼
Cloudflare Edge
  - DNS resolves to Cloudflare's IP (CNAME to tunnel)
  - SSL certificate managed by Cloudflare
  - HTTP/2 termination
    │
    ▼
cloudflared (running on jenkins-server as systemd service)
  - Outbound persistent tunnel, authenticated by token
  - Forwards to configured URL: localhost:80
    │
    ▼
Nginx on jenkins-server :80
  - Reverse proxy
  - Forwards to Jenkins :8080
    │
    ▼
Jenkins LTS process
  - Listens on 127.0.0.1:8080
  - Only reachable locally
Security Posture
- No open inbound ports - Jenkins listens only on
127.0.0.1:8080; Nginx on0.0.0.0:80but the VM has no public IP - Attack surface reduction - attackers cannot directly probe the origin server
- Zero Trust enforcement - Cloudflare can apply MFA, geo-blocking, and access policies at the edge before forwarding
Phase 6: From Manual Commands to Custom Rootfs Images
The Repetition Problem
At this point the EC2 architecture was fully replicated on iximiuz Labs. But reaching this state required hundreds of manual commands. Every new playground creation would require: install Jenkins/SonarQube/Nexus from scratch, install and configure Nginx, install PostgreSQL, install cloudflared, configure systemd, apply all custom settings. This was unsustainable.
iximiuz Labs Custom Rootfs Feature
iximiuz Labs supports OCI-compliant custom rootfs images as VM root filesystems. Instead of using a stock Ubuntu image, a custom Docker image containing all pre-installed software and configurations is specified as the playground drive. The image is pulled from GHCR and mounted as the VM's root filesystem.
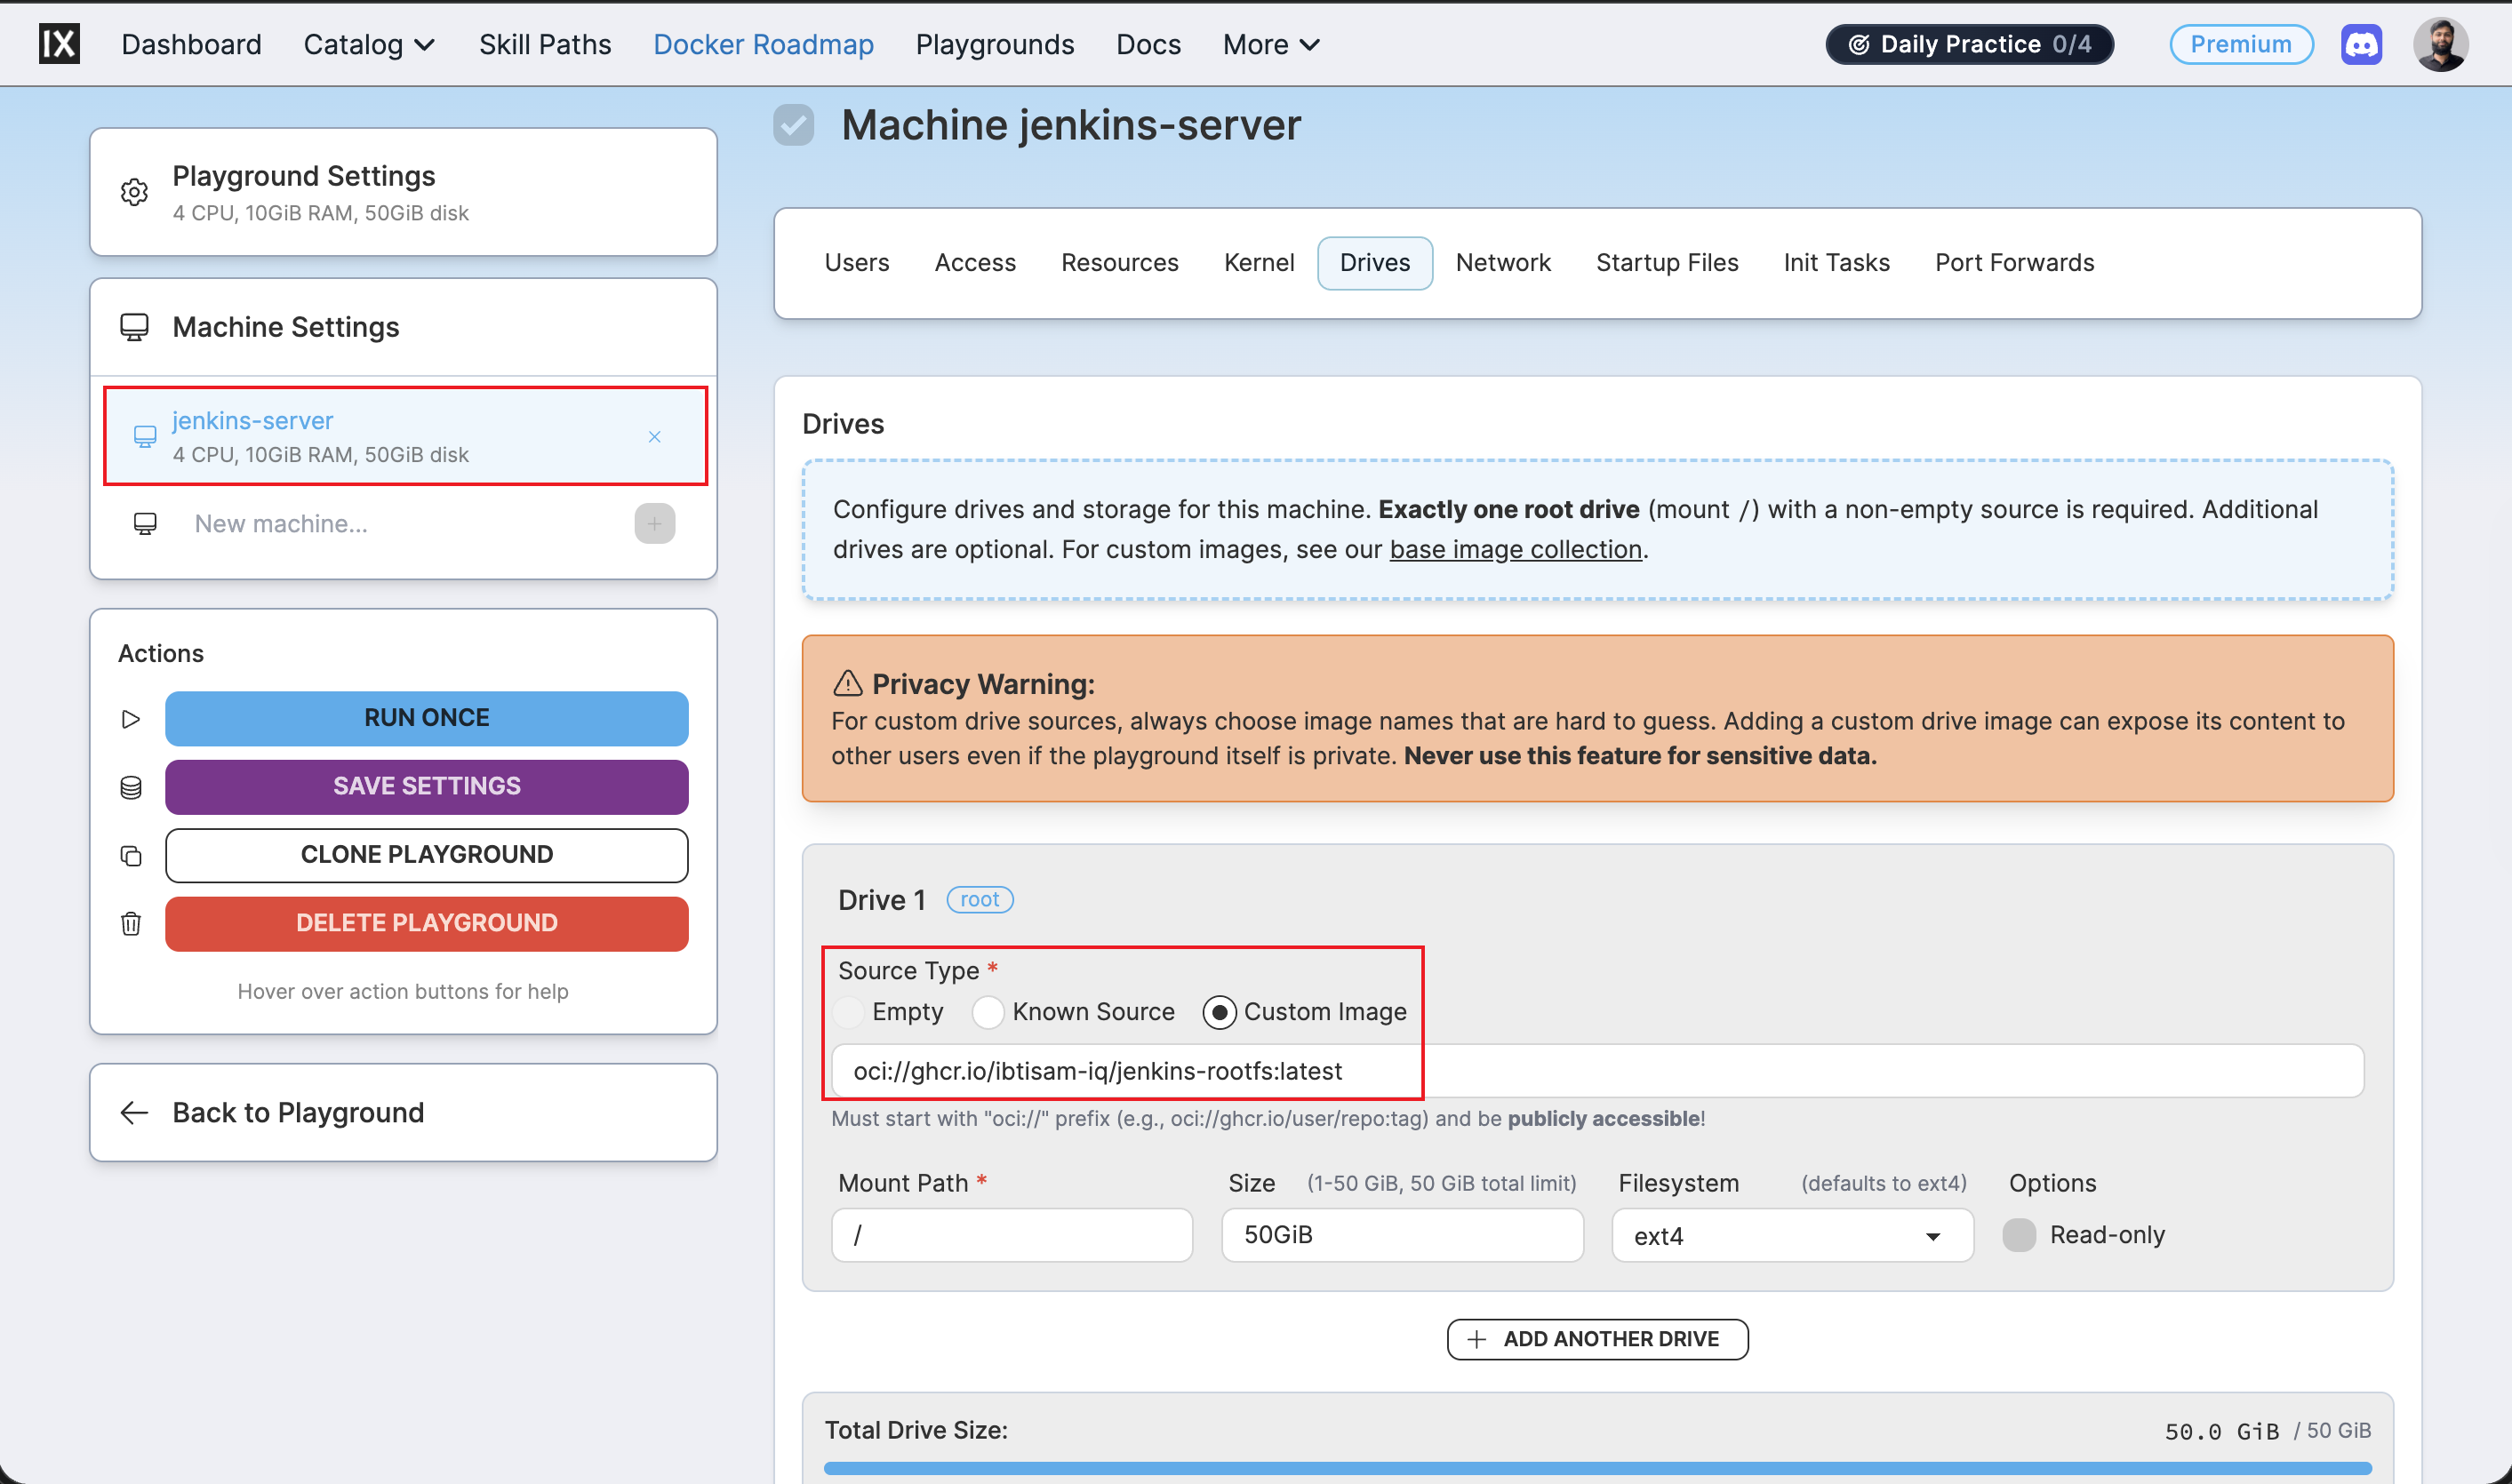
What Was Baked Into Each Image
| Image | What's pre-installed |
|---|---|
ghcr.io/ibtisam-iq/jenkins-rootfs | Jenkins LTS, Java 21, Nginx (reverse proxy → :8080), cloudflared, systemd units |
ghcr.io/ibtisam-iq/sonarqube-rootfs | SonarQube 26.2 CE, Java 21, PostgreSQL 18, Nginx (→ :9000), cloudflared, systemd units |
ghcr.io/ibtisam-iq/nexus-rootfs | Nexus 3.89.1 CE, Java 21, Nginx (→ :8081), cloudflared, systemd units |
ghcr.io/ibtisam-iq/dev-cicd-rootfs | Jump host tooling, SSH aliases for stack navigation |
What is NOT baked in (by design):
cloudflaredtunnel tokens - these are per-playground secrets; they must be supplied at runtime viasudo cloudflared service install <token>- Jenkins initial admin password - generated fresh per boot
- SonarQube initial admin password - always
admin(changed during first-login setup wizard) - Nexus initial admin password - located at
/opt/sonatype-work/nexus3/admin.passwordon first boot - PostgreSQL database contents - provisioned fresh by
lab-init.shat each boot
The Result
Creating a new playground now takes one command:
All four nodes boot with their services running. The only remaining manual step is running the Cloudflare tunnel install command on each service node.
Related
- Setup - CI/CD Stack Orchestration - manifest, node topology, Dev Machine
- Self-Hosted CI/CD Stack - Operations - Jenkins, SonarQube, Nexus post-provisioning configuration
- Jenkins Rootfs runbook
- SonarQube Rootfs runbook
- Nexus Rootfs runbook